Laravel
Diagnosing Nginx errors on PHP 8.2
Upon testing some new functionality locally, I noticed that I was getting my favorite error, 502 Bad Gateway.
I had a look at the error logs in ~/.config/valet/Log/nginx-error.log and found this grouping of errors:
2023/11/17 13:42:09 [error] 89485#0: *1 connect() to unix:/Users/jbrayton/.config/valet/valet.sock failed (61: Connection refused) while connecting to upstream, client: 127.0.0.1, server: stripe-sync.test, request: "GET / HTTP/2.0", upstream: "fastcgi://unix:/Users/jbrayton/.config/valet/valet.sock:", host: "stripe-sync.test"
2023/11/17 13:43:21 [error] 89483#0: *12 connect() to unix:/Users/jbrayton/.config/valet/valet.sock failed (61: Connection refused) while connecting to upstream, client: 127.0.0.1, server: stripe-sync.test, request: "GET / HTTP/2.0", upstream: "fastcgi://unix:/Users/jbrayton/.config/valet/valet.sock:", host: "stripe-sync.test"
2023/11/17 13:45:54 [error] 89476#0: *44 connect() to unix:/Users/jbrayton/.config/valet/valet.sock failed (61: Connection refused) while connecting to upstream, client: 127.0.0.1, server: stripe-sync.test, request: "GET / HTTP/2.0", upstream: "fastcgi://unix:/Users/jbrayton/.config/valet/valet.sock:", host: "stripe-sync.test"
2023/11/17 13:51:39 [error] 89471#0: *49 connect() to unix:/Users/jbrayton/.config/valet/valet.sock failed (61: Connection refused) while connecting to upstream, client: 127.0.0.1, server: larajobs-menubar.test, request: "GET / HTTP/2.0", upstream: "fastcgi://unix:/Users/jbrayton/.config/valet/valet.sock:", host: "larajobs-menubar.test"
I performed a generic Google search for nginx "*12 connect()" to unix
Nothing hit me directly but it did highlight the excellent primer on Datadog NGINX 502 Bad Gateway: PHP-FPM
I ran valet links to get a list of other sites to try to see if this was isolated to a PHP version and it was, PHP 8.2 was the only one having problems.
I had tried valet restart and valet restart php but that didn't help.
I wanted to check the status of services to make sure they were running and we can do that via valet status:
Checking status...

Valet status: Error

+--------------------------------------+----------+
| Check                                | Success? |
+--------------------------------------+----------+
| Is Valet fully installed?            | Yes      |
| Is Valet config valid?               | Yes      |
| Is Homebrew installed?               | Yes      |
| Is DnsMasq installed?                | Yes      |
| Is Dnsmasq running?                  | Yes      |
| Is Dnsmasq running as root?          | Yes      |
| Is Nginx installed?                  | Yes      |
| Is Nginx running?                    | Yes      |
| Is Nginx running as root?            | Yes      |
| Is PHP installed?                    | Yes      |
| Is linked PHP (php) running?         | No       |
| Is linked PHP (php) running as root? | No       |
| Is valet.sock present?               | Yes      |
+--------------------------------------+----------+

Debug suggestions:
Run `valet restart`.
Uninstall PHP with Brew and run `valet use php@8.2`
I ended up using valet use php@8.2 --force in the end:
⋊> brew uninstall php
Error: Refusing to uninstall /usr/local/Cellar/php/8.2.11
because it is required by composer, php-cs-fixer and wp-cli, which are currently installed.
You can override this and force removal with:
  brew uninstall --ignore-dependencies php
⋊> valet use php@8.2
Valet is already using version: php@8.2. To re-link and re-configure use the --force parameter.

⋊> valet use php@8.2 --force
Unlinking current version: php
Linking new version: php@8.2
Stopping phpfpm...
Stopping php@7.2...
Stopping php@8.1...
Installing and configuring phpfpm...
Updating PHP configuration for php@8.2...
Restarting php@8.1...
Restarting php@7.1...
Restarting php@7.4...
Restarting php@7.2...
Restarting php@7.3...
Restarting php...
Restarting nginx...
Valet is now using php@8.2.

Note that you might need to run composer global update if your PHP version change affects the dependencies of global packages required by Composer.
The stop messages not aligning with the restarts is particularly interesting and likely part of what I was dealing with. I hadn't tried sites tied to each version independently.
Laravel Valet for Production Domains
Recently, after a brief outage at work, I wondered if it would be possible to replicate the problem locally using Laravel Valet. My Google search landed on this StackOverflow post, where the answers shot down the idea. Not to be dissuaded by something I read on the internet, I started investigating if it was possible and stumbled upon what I think is a viable solution. There aren't very many hoops to jump through or major quirks so I believe it's not only possible but could be supported out of the box.
In my case, I want to proxy the domain scdn-app.thinkorange.com through my local version of the Laravel application.
- Edit
~/.config/valet/config.jsonon macOS and change thetldparameter fromtesttocom. - Change to the directory of your application.
- Run the command
valet link scdn-app.thinkorangeto set up our valet configuration to point the domain to this directory. - Run the command
valet secure scdn-app.thinkorangeto set up the SSL certificate. - Change the directory to dnsmasq
cd ~/.config/valet/dnsmasq.d. - Copy the existing TLD config to cover the .com domain with the command
cp tld-test.conf tld-com.conf. - Edit the new file to change the first address line to
address=/.com/127.0.0.1and save the file. - (Optionally) Isolate the site to PHP 8.1 with the command
valet isolate --site scdn-app.thinkorange php@8.1. - Change your
/etc/hostsfile to redirect the domain to127.0.0.1for ipv4 and::1. I use the excellent Gas Mask to make this step easier.
Now we should have a functional production proxy through our local machine. This configuration creates a few problems around keeping the com TLD.
Fortunately, a few extra steps are necessary for us to switch back to .test while also keeping this site functional.
- Edit
~/.config/valet/config.jsonagain and change thetldparameter fromcomback totest. This change will immediately break our site. - Change to the Sites directory
cd ~/.config/valet/Sites. - If we use
ls -alto list the directory, we'll see our sitescdn-app.thinkorange. Let's change that. - Run the command
mv scdn-app.thinkorange scdn-app.thinkorange.com.
Our site should now be working again. We are also able to continue serving our previous local test domains.
Because we can create a permanently functional system using these steps, I believe it should be possible to create a pull request to reduce the number of hoops we have to jump through.
I'd love to be able to run valet link scdn-app.thinkorange.com. with a period at the end to denote I'm including the full domain with TLD.
That would eliminate the temporary step of editing the config.json file, and the Sites directory would just work(TM) as it would include the .com directory name.
I don't believe we even need the dnsmasq changes as I'm able to navigate to a functional site without them.
I believe Gas Mask is doing the work, but it's better to be safe than sorry.
If you'd prefer a YouTube video where I stumble through recreating these steps from scratch:
Laravel Passport usage with Swaggervel v2.3
Overview
I've been using this Swaggervel package with almost all my recent Laravel projects. A few instances were lightly customized to work against different authentication schemes and I only briefly touched on using Laravel Passport.
I wanted to highlight a few areas while also offering up an example project as a lightly opinionated jumping off point. Just the highlights cover quite a bit of information but the example should have ample information in commit messages and in the finished product.
Setting up Laravel and Laravel Passport
First we run laravel new <project_name>, git init and commit immediately to mark our base Laravel installation.
I've always preferred this immediate commit over making customizations first as it's far easier to track your customizations versus the base install.
Next, we run through the Laravel Passport docs with the following caveats:
php artisan vendor:publish --tag=passport-migrationsdoesn't copy the migrations as expected. We manually do this.php artisan migrate --stepcreates a migration batch for each migration file individually. This lets us rollback to individual steps and is primarily personal preference.app/Providers/AuthServiceProvidercontains the following:
Passport::routes(function (RouteRegistrar $routeRegistrar) {
    $routeRegistrar->all();
});
Passport::tokensCan([
]);
Passport::enableImplicitGrant();
Passport::tokensExpireIn(Carbon::now()->addDays(15));
Passport::refreshTokensExpireIn(Carbon::now()->addDays(30));-
Run
artisan make:authto utilize the app layout and create ahomeview that is protected by the Login prompt.- The Passport Vue components could be displayed on the welcome page but we're attempting to set future users up for better practices.
-
Create a proper
WelcomeControllerwith matching view that utilizes the same app layout- This is not necessary but this one step makes it possible to properly utilize
artisan route:cachein the future as route closures aren't supported.
- This is not necessary but this one step makes it possible to properly utilize
Setting up Swaggervel
Now that the basics are complete, we bring in Swaggervel via composer require appointer/swaggervel --dev.
We can ignore the line in the documentation that mentions adding Appointer\Swaggervel\SwaggervelServiceProvider::class as that's only for Laravel versions earlier than 5.5 without package discovery.
It's necessary to run artisan vendor:publish to publish the content as we're using this package as a dev dependency and the assets won't show up otherwise.
Now that Swaggervel is in place we can bring it all together.
To start, we create the file app/Http/Controllers/Api/v1/Controller.php as our generic API base controller.
This controller houses our root-level @SWG\Info definition in a convenient location.
This also sets us up for future work where API controllers are versioned, though this is personal preference.
The secret sauce is the @SWG\SecurityScheme annotation:
/**
 *   @SWG\SecurityScheme(
 *     securityDefinition="passport-swaggervel_auth",
 *     description="OAuth2 grant provided by Laravel Passport",
 *     type="oauth2",
 *     authorizationUrl="/oauth/authorize",
 *     tokenUrl="/oauth/token",
 *     flow="accessCode",
 *     scopes={
 *       *
 *     }
 *   ),
 */
The securityDefinition property is arbitrary but needs to be included in every protected route definition.
You can specify multiple security schemes to cover things like an generic api key or likely multiple OAuth flows, though I haven't tried working out the latter.
These are the supported flows and it's important to note that Swaggervel is currently on the OpenAPI 2.0 specification, though this may change in the future.
The scopes specified includes everything (*) but we could define any scopes explicitly.
It should be noted that we also need to setup the route definitions in our resource Controller classes but due to the verbosity they are too much to include in this post.
A small snippet that is unique to working with this setup is the following:
*   security={
*     {
*        "passport-swaggervel_auth": {"*"}
*     }
*   },
This tells a specific endpoint to use the securityDefinition created earlier and it's important that these match.
The example project has rudimentary UserController, User model, and UserRequest definitions that should be a decent starting point, though I can't vouch for them being very comprehensive.
Configuring our OAuth Client
First we need to create an OAuth client specifically for Swaggervel connections.
Go to the /home endpoint and under OAuth Clients click Create New Client.
Under Name specify Laravel Passport Swaggervel or just Swaggervel.
Under Redirect URL we're unable to specify /vendor/swaggervel/oauth2-redirect.html directly, so use a placeholder like https://passport-swaggervel.test/vendor/swaggervel/oauth2-redirect.html instead.
Using your SQL toolbox of choice, navigate to the table oauth_clients and look for the row with the name specified in the previous step, in our case Laravel Passport Swaggervel.
Manually update the redirect column to /vendor/swaggervel/oauth2-redirect.html.
Now that our OAuth client in Passport should be setup correctly, we focus our attention on the config/swaggervel.php settings.
The client-id should be set to what Passport shows in the UI as the Client ID field.
This is also the id of the row in the oauth_clients table.
The client-secret should be set to the what Passport shows in the UI as the Secret field.
We also set both secure-protocol and init-o-auth to true, the latter of which fills in the UI with our secrets otherwise we'd have to put them in manually.
Correcting Swagger UI to Capture Tokens
For the OAuth2 redirect to function properly we need to modify the Swagger UI configuration in resources/views/vendor/swaggervel/index.blade.php.
Under const ui = SwaggerUIBundle({ right below the url parameter should be oauth2RedirectUrl: '/vendor/swaggervel/oauth2-redirect.html',.
This reinforcement is necessary as the Swagger UI doesn't 'catch' the tokens properly without this.
Other notable additions that make the UI slightly easier to work with:
tagsSorter: 'alpha',
operationsSorter: 'alpha',
docExpansion: 'list',
filter: true
Testing Authentication via the Swagger UI
First we go to the api/docs endpoint to display the Swagger UI.
Click the Authorize button with the unlocked padlock icon.
Verify the client_id and client_secret sections are filled in.
Click Authorize and the Laravel Passport screen labelled Authorization Request should display with the Authorize and Cancel buttons.
Click Authorize again and you should be redirected back to Swagger with the client_id and client_secret now showing as ****** with a Logout button instead of Authorize.
We should now be able to click on the GET /users route, click the Try it out button, click on the blue Execute button and be greeted with our expected response as a list of users.
Conclusion
We've hopefully highlighted the basic touch points of the process with the example code going into much further detail. The project is lightly opinionated to facilitate practices that have served me well so far. It is by no means a complete reference but it should be a good jumping off point when it's somewhat harder to see the big picture without a comprehensive example.
In case you need the link to the project again.
Laravel Passport displays Basic Authentication prompt
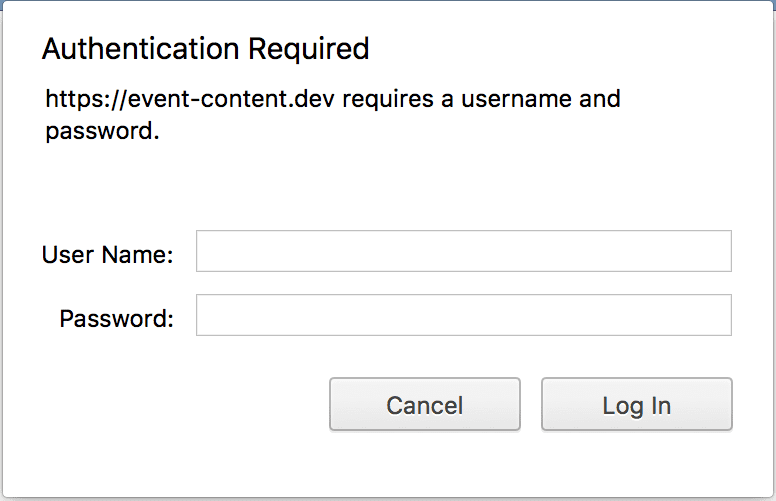
I've been bitten by this issue so many times that I have a form of amnesia where I forget that it happened all over again. This github issue highlights the problem but I'm more of a visual learner.
The problem can be traced back to configuring the redirect_uri parameter incorrectly. OAuth2 highly
requires that the callbacks are identical between the server and consumer(s). For consumers that are
external to the app, this is almost never a problem. For first-party consumers like Swagger(vel), this is
extremely easy to configure incorrectly.
Revisiting Laravel Homestead MySQL Password Expiration
After putting the solution in
my previous post through its paces for a few
weeks, I realized the less intrusive approach is to patch Homestead v2's scripts/create-mysql.sh with the following
snippet:
#!/usr/bin/env bash

cat > /etc/mysql/conf.d/password_expiration.cnf << EOF
[mysqld]
default_password_lifetime = 0
EOF

service mysql restart

DB=$1;

mysql -e "CREATE DATABASE IF NOT EXISTS \`$DB\` DEFAULT CHARACTER SET utf8 DEFAULT COLLATE utf8_unicode_ci";
This change pipes the default_password_lifetime setting into the file /etc/mysql/conf.d/password_expiration.cnf and
restarts the mysql service. The provisioning process then can proceed as normal.
This approach requires no updated
vagrant virtualbox image or
other similar adjustments and allows us to
keep using version 0.3.3 indefinitely.
I'm likely going to abandon my settler and homestead forks as I couldn't adequately maintain them moving forward. I'll work to push this upstream as I feel it should be implemented there.