Development
Laravel Passport usage with Swaggervel v2.3
Overview
I've been using this Swaggervel package with almost all my recent Laravel projects. A few instances were lightly customized to work against different authentication schemes and I only briefly touched on using Laravel Passport.
I wanted to highlight a few areas while also offering up an example project as a lightly opinionated jumping off point. Just the highlights cover quite a bit of information but the example should have ample information in commit messages and in the finished product.
Setting up Laravel and Laravel Passport
First we run laravel new <project_name>, git init and commit immediately to mark our base Laravel installation.
I've always preferred this immediate commit over making customizations first as it's far easier to track your customizations versus the base install.
Next, we run through the Laravel Passport docs with the following caveats:
php artisan vendor:publish --tag=passport-migrationsdoesn't copy the migrations as expected. We manually do this.php artisan migrate --stepcreates a migration batch for each migration file individually. This lets us rollback to individual steps and is primarily personal preference.app/Providers/AuthServiceProvidercontains the following:
Passport::routes(function (RouteRegistrar $routeRegistrar) {
    $routeRegistrar->all();
});
Passport::tokensCan([
]);
Passport::enableImplicitGrant();
Passport::tokensExpireIn(Carbon::now()->addDays(15));
Passport::refreshTokensExpireIn(Carbon::now()->addDays(30));-
Run
artisan make:authto utilize the app layout and create ahomeview that is protected by the Login prompt.- The Passport Vue components could be displayed on the welcome page but we're attempting to set future users up for better practices.
-
Create a proper
WelcomeControllerwith matching view that utilizes the same app layout- This is not necessary but this one step makes it possible to properly utilize
artisan route:cachein the future as route closures aren't supported.
- This is not necessary but this one step makes it possible to properly utilize
Setting up Swaggervel
Now that the basics are complete, we bring in Swaggervel via composer require appointer/swaggervel --dev.
We can ignore the line in the documentation that mentions adding Appointer\Swaggervel\SwaggervelServiceProvider::class as that's only for Laravel versions earlier than 5.5 without package discovery.
It's necessary to run artisan vendor:publish to publish the content as we're using this package as a dev dependency and the assets won't show up otherwise.
Now that Swaggervel is in place we can bring it all together.
To start, we create the file app/Http/Controllers/Api/v1/Controller.php as our generic API base controller.
This controller houses our root-level @SWG\Info definition in a convenient location.
This also sets us up for future work where API controllers are versioned, though this is personal preference.
The secret sauce is the @SWG\SecurityScheme annotation:
/**
 *   @SWG\SecurityScheme(
 *     securityDefinition="passport-swaggervel_auth",
 *     description="OAuth2 grant provided by Laravel Passport",
 *     type="oauth2",
 *     authorizationUrl="/oauth/authorize",
 *     tokenUrl="/oauth/token",
 *     flow="accessCode",
 *     scopes={
 *       *
 *     }
 *   ),
 */
The securityDefinition property is arbitrary but needs to be included in every protected route definition.
You can specify multiple security schemes to cover things like an generic api key or likely multiple OAuth flows, though I haven't tried working out the latter.
These are the supported flows and it's important to note that Swaggervel is currently on the OpenAPI 2.0 specification, though this may change in the future.
The scopes specified includes everything (*) but we could define any scopes explicitly.
It should be noted that we also need to setup the route definitions in our resource Controller classes but due to the verbosity they are too much to include in this post.
A small snippet that is unique to working with this setup is the following:
*   security={
*     {
*        "passport-swaggervel_auth": {"*"}
*     }
*   },
This tells a specific endpoint to use the securityDefinition created earlier and it's important that these match.
The example project has rudimentary UserController, User model, and UserRequest definitions that should be a decent starting point, though I can't vouch for them being very comprehensive.
Configuring our OAuth Client
First we need to create an OAuth client specifically for Swaggervel connections.
Go to the /home endpoint and under OAuth Clients click Create New Client.
Under Name specify Laravel Passport Swaggervel or just Swaggervel.
Under Redirect URL we're unable to specify /vendor/swaggervel/oauth2-redirect.html directly, so use a placeholder like https://passport-swaggervel.test/vendor/swaggervel/oauth2-redirect.html instead.
Using your SQL toolbox of choice, navigate to the table oauth_clients and look for the row with the name specified in the previous step, in our case Laravel Passport Swaggervel.
Manually update the redirect column to /vendor/swaggervel/oauth2-redirect.html.
Now that our OAuth client in Passport should be setup correctly, we focus our attention on the config/swaggervel.php settings.
The client-id should be set to what Passport shows in the UI as the Client ID field.
This is also the id of the row in the oauth_clients table.
The client-secret should be set to the what Passport shows in the UI as the Secret field.
We also set both secure-protocol and init-o-auth to true, the latter of which fills in the UI with our secrets otherwise we'd have to put them in manually.
Correcting Swagger UI to Capture Tokens
For the OAuth2 redirect to function properly we need to modify the Swagger UI configuration in resources/views/vendor/swaggervel/index.blade.php.
Under const ui = SwaggerUIBundle({ right below the url parameter should be oauth2RedirectUrl: '/vendor/swaggervel/oauth2-redirect.html',.
This reinforcement is necessary as the Swagger UI doesn't 'catch' the tokens properly without this.
Other notable additions that make the UI slightly easier to work with:
tagsSorter: 'alpha',
operationsSorter: 'alpha',
docExpansion: 'list',
filter: true
Testing Authentication via the Swagger UI
First we go to the api/docs endpoint to display the Swagger UI.
Click the Authorize button with the unlocked padlock icon.
Verify the client_id and client_secret sections are filled in.
Click Authorize and the Laravel Passport screen labelled Authorization Request should display with the Authorize and Cancel buttons.
Click Authorize again and you should be redirected back to Swagger with the client_id and client_secret now showing as ****** with a Logout button instead of Authorize.
We should now be able to click on the GET /users route, click the Try it out button, click on the blue Execute button and be greeted with our expected response as a list of users.
Conclusion
We've hopefully highlighted the basic touch points of the process with the example code going into much further detail. The project is lightly opinionated to facilitate practices that have served me well so far. It is by no means a complete reference but it should be a good jumping off point when it's somewhat harder to see the big picture without a comprehensive example.
In case you need the link to the project again.
Scratching an Itch with Prometheus
Not too long ago I became obsessed with Prometheus.
I'd heard about it for a while, knew it was powerful, and couldn't quite understand how everything fit together.
The documentation is extremely verbose for good reason but it took playing with it for a while for everything to click.
This post is a rather concise and extensive overview that goes a long way in expressing the basic concepts to my developer brain.
In their simplest form, exporters expose an HTTP endpoint of /metrics with the output being statistics in Prometheus' format.
The real power of Prometheus comes when you expose your own /metrics endpoint and have Prometheus consume the statistics you generate.
This post is also a very good introduction with the section Building your own exporter being extremely valuable in describing just some of the possibilities.
After getting my bearings I started with a prototype with a simple premise "Why look at the usage graphs in Digital Ocean for each server independently? Why not have it in one location?" How To Install Prometheus on Ubuntu 16.04 is a very good primer to get everything up and running quickly.
I've made a few modifications since working through the article:
-
- There have been massive perf improvements in v2.3.x.
-
- There are significant changes to the metrics naming conventions.
- This exporter typically has the most coupling with Grafana dashboards and often requires altering them to work correctly.
-
Use
prometheus:prometheusfor ownership of core prometheus processes likeprometheusoralertmanager.sudo useradd --no-create-home --shell /bin/false prometheus
-
Use
prometheus-exporter:prometheus-exporterfor ownership of exporters. Exporters should possibly be more isolated but I feel it may be a case of YAGNI.sudo useradd --no-create-home --shell /bin/false prometheus-exporter
-
Set scrape_interval to 1 minute:
scrape_interval: 1m.- 15 seconds is still doable but I'm currently not concerned with very granular detail.
- This reduces the load of making 4 calls per minute to just 1, reducing some overhead required for Prometheus and every exporter.
At $dayJob we've moved to provisioning servers using Laravel Forge, which has the possibility of utilizing exporters for mysqld, mariadb, postgres, memcached, redis, beanstalkd, nginx, php-fpm, and sendmail.
I've opted to use node_exporter, mysqld, nginx-vts-exporter, php-fpm, and redis respectively.
To put the original premise into perspective, replicating the newer monitoring agent graphs in Digital Ocean only require node_exporter.
A few of the exporters require very little setup, only setting a few configuration variables systemd service definitions. Other exporters like nginx-vts-exporter require building nginx from source.
I plan to introduce a series of posts that should aid in getting a very rudimentary implementation running. There is an abundant usage of Kubernetes in the Prometheus ecosystem, to the point that it almost seems required but fortunately it also just works(tm) in a traditional virtual machine without any real fuss.
Code School transition woes
In this blog post on January 26 2015, Code School became part of Pluralsight. The website codeschool.com continued to operate normally until earlier this year when a banner showed the site would shut down and transition to Pluralsight June 1st. The banner pointed to this url, which gives a great overview of the changes but was sparse on what would take place during the transition.
It wasn't until June 1st that I finally understood the full breadth of the transition and stumbled upon the integration faqs. The important bit of information is this snippet:
Will I be able to access my Code School invoices or course history?
No. Your invoices and course history will not carry over or be accessible as of 6/1.
Code School customers were instructed to generate a PDF of their profile before the migration. Due to finding the integration FAQs after June 1st, sadly I wasn't able to do that in time.
What particularly impacts me the most is a belief that pointing potential employers to a reputable website as a source of truth carries far more weight than a PDF that can be altered. As a web developer in an industry where employers seem to assume a resume is partially or wholly embellished, this seems like a step backwards.
In spite of the transition pains, I do find Pluralsight's Skill IQ to be a fresh way to measure competency with multiple choice questions that cover broad aspects of a given topic.
You're shown what is marked wrong so you can learn from your mistake and the equivalent of the old Code School subscription I believe allows unlimited retests.
The integration with Stack Overflow's developer story is compelling enough to use it and I did gain quite a sense of accomplishment when I scored in the very low expert level range.
As I finished typing this up I noticed Pluralsight seems to have a fair number of the Code School courses by searching for the keyword "Code School".
There are newer interactive courses like the one titled HTML 5 and CSS 3: Overview of Tag, Attribute and Selector Additions but the introductory video includes the Front End Formations title that it was called on Code School.
It appears that some of the content is migrating over but things aren't 1:1 so we may never get credit for courses we've essentially completed.
I plan on going through the course shortly as I hope at least the challenges have been updated but it would be a terrible experience to go through all of this realizing I've accomplished it recently.
I don't quite know how I feel about the transition a month in and now after noticing at least some of the content was moved over. It's hard to lose the accomplishments but the outcome would've been no different if Code School closed completely. It does have me pause to make sure the course accomplishments I share are worth the investment and that's likely an important thing to remember whenever similar services catch my attention.
Laravel Passport displays Basic Authentication prompt
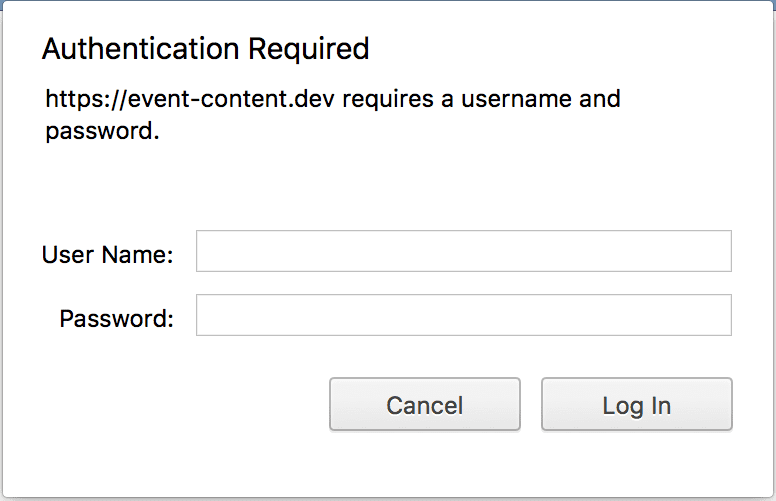
I've been bitten by this issue so many times that I have a form of amnesia where I forget that it happened all over again. This github issue highlights the problem but I'm more of a visual learner.
The problem can be traced back to configuring the redirect_uri parameter incorrectly. OAuth2 highly
requires that the callbacks are identical between the server and consumer(s). For consumers that are
external to the app, this is almost never a problem. For first-party consumers like Swagger(vel), this is
extremely easy to configure incorrectly.
Revisiting Laravel Homestead MySQL Password Expiration
After putting the solution in
my previous post through its paces for a few
weeks, I realized the less intrusive approach is to patch Homestead v2's scripts/create-mysql.sh with the following
snippet:
#!/usr/bin/env bash

cat > /etc/mysql/conf.d/password_expiration.cnf << EOF
[mysqld]
default_password_lifetime = 0
EOF

service mysql restart

DB=$1;

mysql -e "CREATE DATABASE IF NOT EXISTS \`$DB\` DEFAULT CHARACTER SET utf8 DEFAULT COLLATE utf8_unicode_ci";
This change pipes the default_password_lifetime setting into the file /etc/mysql/conf.d/password_expiration.cnf and
restarts the mysql service. The provisioning process then can proceed as normal.
This approach requires no updated
vagrant virtualbox image or
other similar adjustments and allows us to
keep using version 0.3.3 indefinitely.
I'm likely going to abandon my settler and homestead forks as I couldn't adequately maintain them moving forward. I'll work to push this upstream as I feel it should be implemented there.