Development
Do you want to build an ElixirLS?
There are certain instances where you may want to build ElixirLS to run against the version of Elixir/Erlang that you're using. The recommendation from the package is:
If you're packaging these archives in an IDE plugin, make sure to build using the minimum supported OTP version for the best backward-compatibility If you're like me, you may not care to support older versions of Elixir. How do we configure the plugin to run the latest version?
The output I see in VSCode's Output tab (Shift-Command-U on macOS) for the ElixirLS extension:
[Info  - 4:33:53 PM] Started ElixirLS v0.13.0
[Info  - 4:33:53 PM] ElixirLS built with elixir "1.12.3" on OTP "22"
[Info  - 4:33:53 PM] Running on elixir "1.14.2 (compiled with Erlang/OTP 25)" on OTP "25"
[Info  - 4:33:53 PM] Elixir sources not found (checking in /home/build/elixir). Code navigation to Elixir modules disabled.
[Info  - 4:33:54 PM] Loaded DETS databases in 32ms
[Info  - 4:33:54 PM] Starting build with MIX_ENV: test MIX_TARGET: host
[Info  - 4:33:55 PM] Compile took 854 milliseconds
There are numerous articles on building from source. What if we'd prefer to build the extension instead?
Let's unpack that Docker command to perform each step:
- Clone the repository with the latest branch:
git clone --recursive --branch v0.13.0 https://github.com/elixir-lsp/vscode-elixir-ls.git /tmp/vscode-elixir-ls. - Change to our temp directory:
cd /tmp/vscode-elixir-ls. - Install npm dependencies:
npm install. - Change to the
elixir-lsdirectory:cd elixir-ls. - Install Elixir dependencies:
mix deps.get. - Change to the parent directory:
cd ... - Package the extension:
npx vsce package. - Make an
extensionsdirectory in $HOME:mkdir -p $HOME/extensions. - Copy the extension:
cp /tmp/vscode-elixir-ls/elixir-ls-0.13.0.vsix $HOME/extensions. - Remove the temporary directory:
rm -rf /tmp/vscode-elixir-ls.
It is crucial to install Elixir v1.14.x and Erlang 25.1.x using your favorite method prior to packaging the new extension. I'm using asdf global to do this, but you could create a local .tool-versions inside the tmp folder if you wish.
The extension should now live at /tmp/vscode-elixir-ls/elixir-ls-0.13.0.vsix.
The remaining steps copy the package to a directory the Docker container knows, and it's okay to stop here.
Because the prepublish.bash file that executes at step #7 runs mix deps.get, we can eliminate steps 4, 5, and 6.
These commands also compile the extension using MIX_ENV=dev, which we may not want.
To change this, we can edit the last line in prepublish.bash to MIX_ENV=prod mix elixir_ls.release -o ../elixir-ls-release to compile for production.
Putting all of the (now reduced) commands together:
git clone --recursive --branch v0.13.0 https://github.com/elixir-lsp/vscode-elixir-ls.git /tmp/vscode-elixir-ls
cd /tmp/vscode-elixir-ls
npm install
npx vsce package
mkdir -p $HOME/extensions
cp /tmp/vscode-elixir-ls/elixir-ls-0.13.0.vsix $HOME/extensions
rm -rf /tmp/vscode-elixir-ls
We can install the extension from the VSIX file using the UI or the command code --install-extension $HOME/extensions/elixir-ls-0.13.0.vsix.
To take advantage of the new extension in our projects, we need to rm -rf .elixir_ls and navigate to an Elixir file.
ElixirLS won't start compiling until an Elixir file is open in the editor, and it'll usually take a few minutes to rebuild everything.
With the new extension installed we should see the change in VSCode's Output tab:
[Info  - 4:35:42 PM] Started ElixirLS v0.13.0
[Info  - 4:35:43 PM] ElixirLS built with elixir "1.14.2" on OTP "25"
[Info  - 4:35:43 PM] Running on elixir "1.14.2 (compiled with Erlang/OTP 25)" on OTP "25"
[Info  - 4:35:43 PM] Elixir sources not found (checking in /home/build/elixir). Code navigation to Elixir modules disabled.
[Info  - 4:35:48 PM] Loaded DETS databases in 414ms
[Info  - 4:35:48 PM] Starting build with MIX_ENV: test MIX_TARGET: host
[Info  - 4:35:49 PM] Compile took 1811 milliseconds
asdf Seems Broken After Homebrew Upgrade
I upgraded the excellent asdf version manager using Homebrew and ran into a snag when trying to perform mix commands.
I encounterd the error /Users/jbrayton/.asdf/shims/mix: line 13: /usr/local/Cellar/asdf/0.10.2/libexec/bin/asdf: No such file or directory.
The key to notice here is the path /usr/local/Cellar/asdf/0.10.2/ when the newest version is 0.11.0, as there is clearly a mismatch.
I restarted my terminal and shell, but the problem persisted. I noticed all the files in ~/.asdf/shims had the line exec /usr/local/Cellar/asdf/0.10.2/libexec/bin/asdf exec "odbcserver" "$@" # asdf_allow: ' asdf '.
This line is not what we wanted and indicates the problem.
After looking at the pinned https://github.com/asdf-vm/asdf/issues/785 and then following that to https://github.com/asdf-vm/asdf/issues/1393, the solution rm -rf ~/.asdf/shims; asdf reshim fixes my problem.
Now, whenever I examine one of the shim files, I see the line exec /usr/local/opt/asdf/libexec/bin/asdf exec "mix" "$@" # asdf_allow: ' asdf ' as expected.
The directory /usr/local/opt is what I see when I run the command brew --prefix asdf as the prefix is no longer /usr/local/Cellar/asdf/0.10.2/ or the Cellar location.
This corrective measure should be a more permanent solution moving forward as the prefix /usr/local/opt should no longer change in the future.
This issue was also somewhat of a perfect storm as Phoenix 1.7 rc.1 dropped two days ago and I had just upgraded a bunch of homebrew packages, including asdf.
Laravel Valet for Production Domains
Recently, after a brief outage at work, I wondered if it would be possible to replicate the problem locally using Laravel Valet. My Google search landed on this StackOverflow post, where the answers shot down the idea. Not to be dissuaded by something I read on the internet, I started investigating if it was possible and stumbled upon what I think is a viable solution. There aren't very many hoops to jump through or major quirks so I believe it's not only possible but could be supported out of the box.
In my case, I want to proxy the domain scdn-app.thinkorange.com through my local version of the Laravel application.
- Edit
~/.config/valet/config.jsonon macOS and change thetldparameter fromtesttocom. - Change to the directory of your application.
- Run the command
valet link scdn-app.thinkorangeto set up our valet configuration to point the domain to this directory. - Run the command
valet secure scdn-app.thinkorangeto set up the SSL certificate. - Change the directory to dnsmasq
cd ~/.config/valet/dnsmasq.d. - Copy the existing TLD config to cover the .com domain with the command
cp tld-test.conf tld-com.conf. - Edit the new file to change the first address line to
address=/.com/127.0.0.1and save the file. - (Optionally) Isolate the site to PHP 8.1 with the command
valet isolate --site scdn-app.thinkorange php@8.1. - Change your
/etc/hostsfile to redirect the domain to127.0.0.1for ipv4 and::1. I use the excellent Gas Mask to make this step easier.
Now we should have a functional production proxy through our local machine. This configuration creates a few problems around keeping the com TLD.
Fortunately, a few extra steps are necessary for us to switch back to .test while also keeping this site functional.
- Edit
~/.config/valet/config.jsonagain and change thetldparameter fromcomback totest. This change will immediately break our site. - Change to the Sites directory
cd ~/.config/valet/Sites. - If we use
ls -alto list the directory, we'll see our sitescdn-app.thinkorange. Let's change that. - Run the command
mv scdn-app.thinkorange scdn-app.thinkorange.com.
Our site should now be working again. We are also able to continue serving our previous local test domains.
Because we can create a permanently functional system using these steps, I believe it should be possible to create a pull request to reduce the number of hoops we have to jump through.
I'd love to be able to run valet link scdn-app.thinkorange.com. with a period at the end to denote I'm including the full domain with TLD.
That would eliminate the temporary step of editing the config.json file, and the Sites directory would just work(TM) as it would include the .com directory name.
I don't believe we even need the dnsmasq changes as I'm able to navigate to a functional site without them.
I believe Gas Mask is doing the work, but it's better to be safe than sorry.
If you'd prefer a YouTube video where I stumble through recreating these steps from scratch:
Livebook Autosaves
Tell me if you've done this before. You write up a nice little prototype of an idea in Livebook. You then get distracted by life situations like eating, writing an email, or taking a nap. You feel the need to close Livebook or prune the multiple sessions you've had running for weeks now. Because you have a million tabs open (with a session manager) and too many in Livebook to individually check, you restart your computer and let it crash(TM). When you open up Livebook again, "Oh. Shiiiiit" you exclaim. Where the hell did that notebook go? I'm 100% sure I clicked the disk icon, what the hell? If you're like me, you may have created this forked Livebook from memory, possibly taking a better approach.
There is a better way to handle this scenario. Livebook has had autosaves since 0.4:
The feature was added in this PR according to the changelog:
https://github.com/livebook-dev/livebook/pull/736
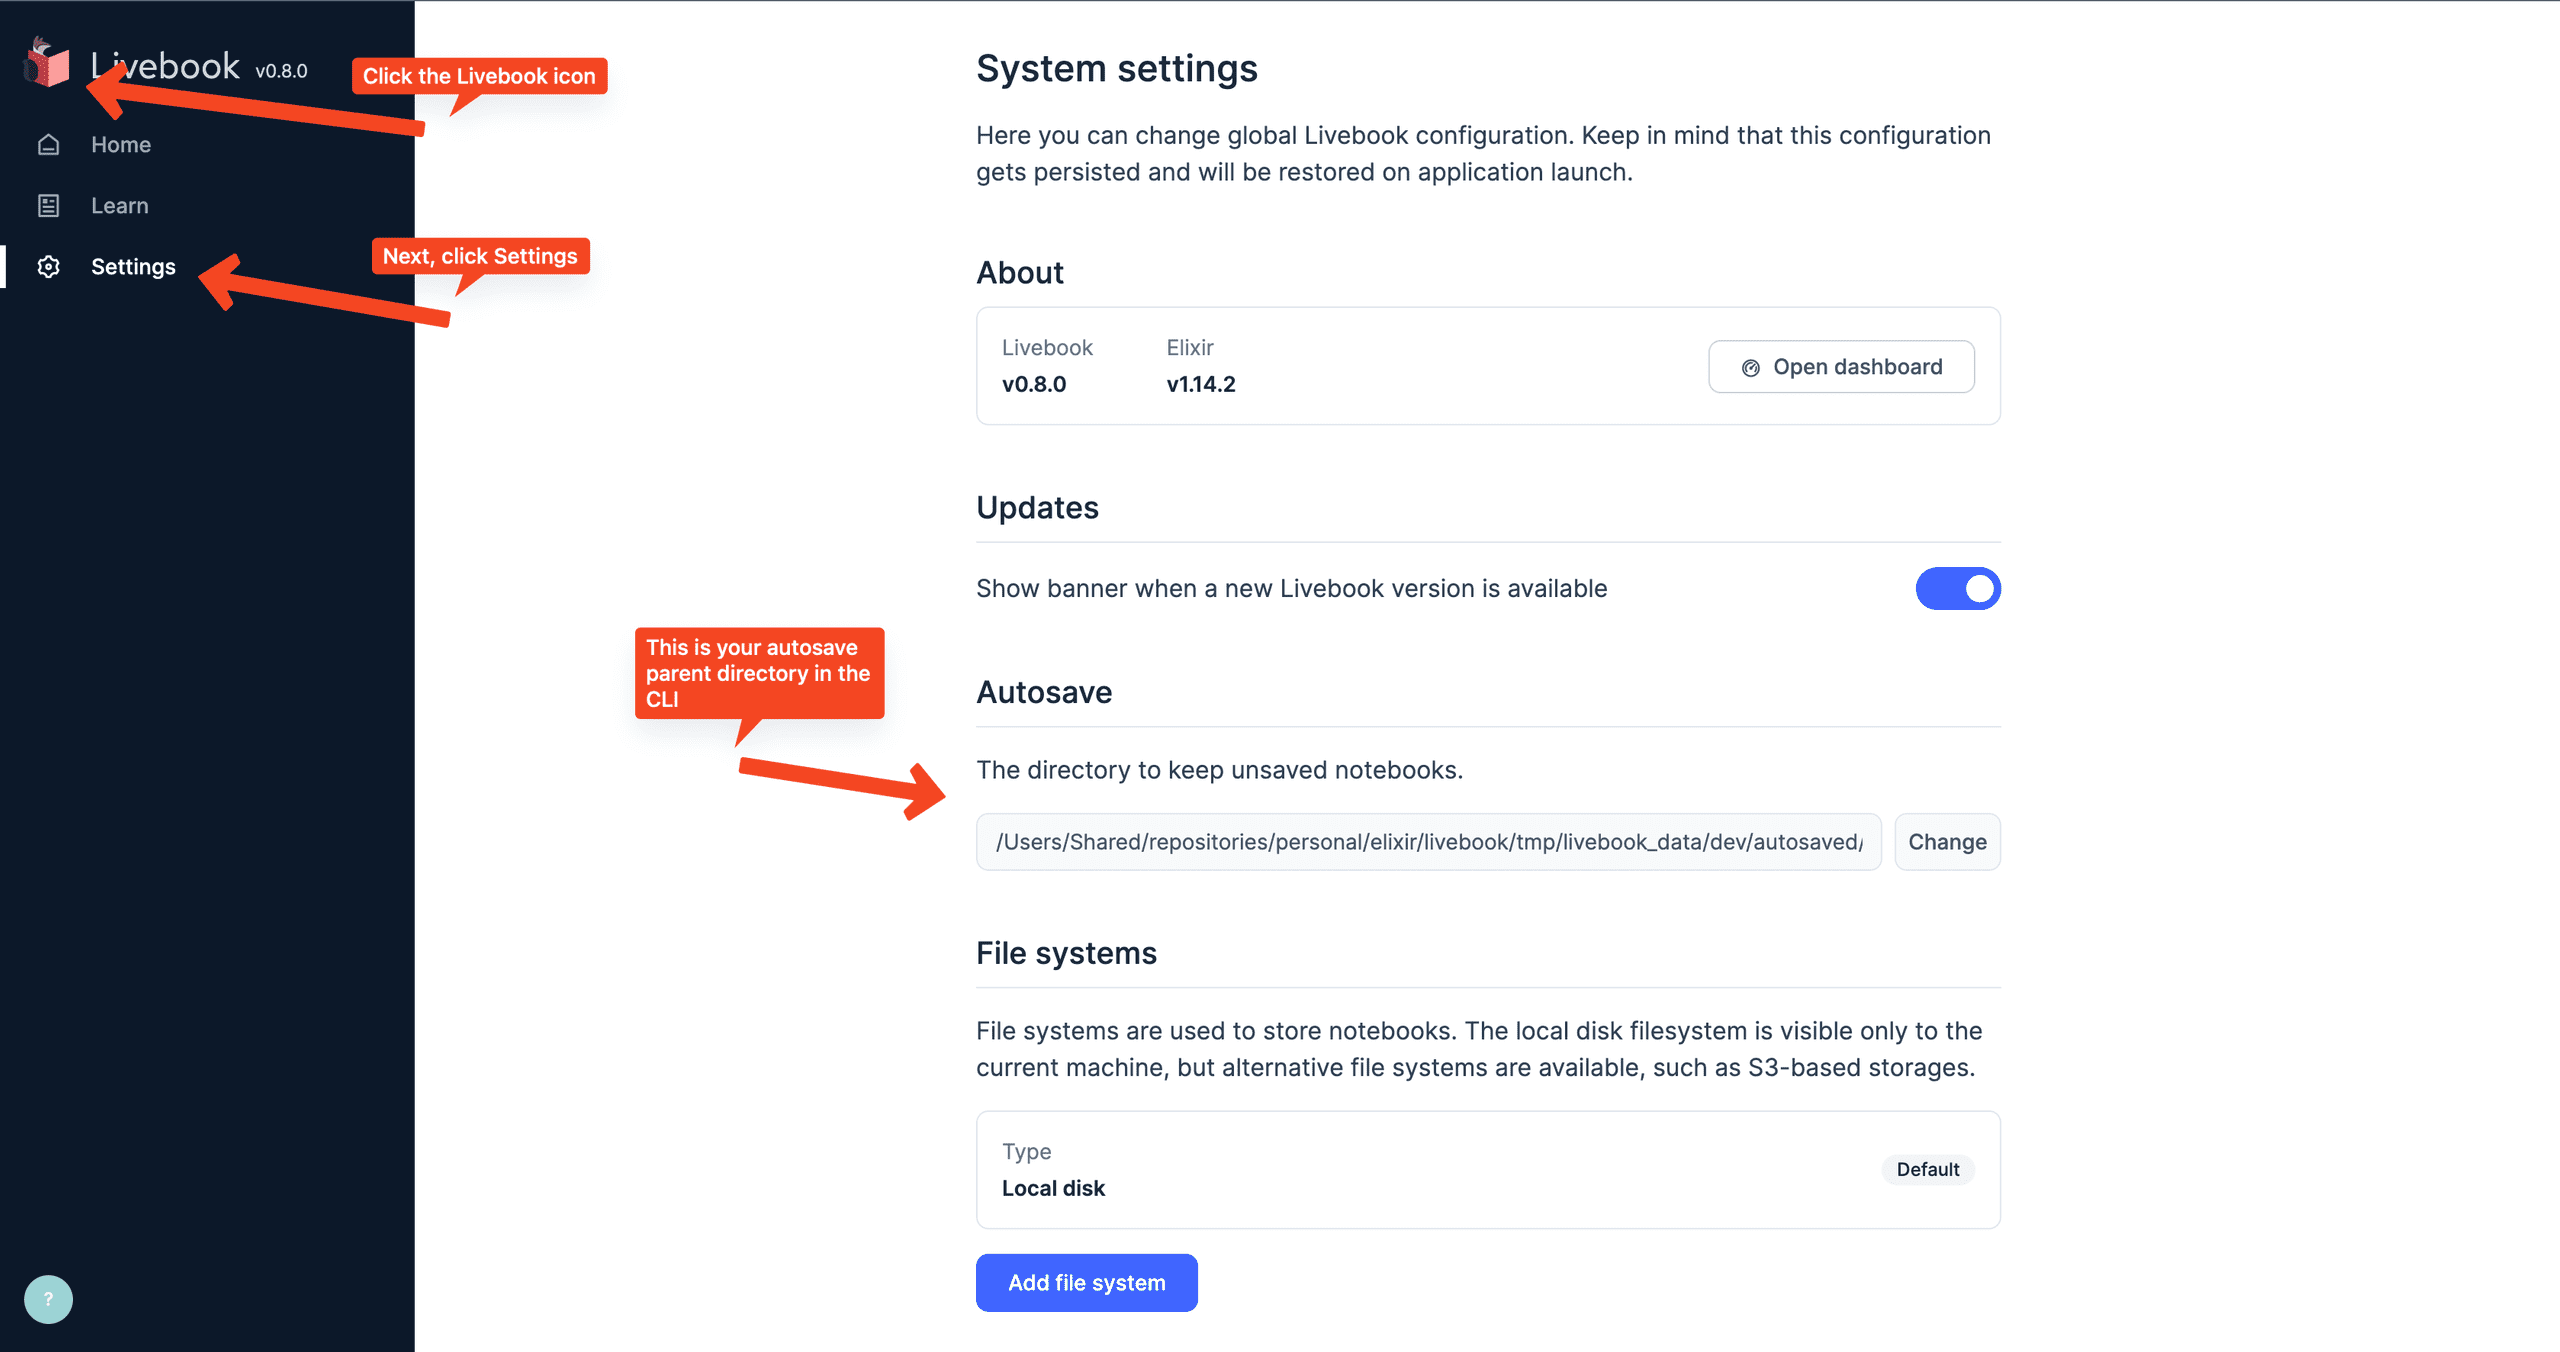
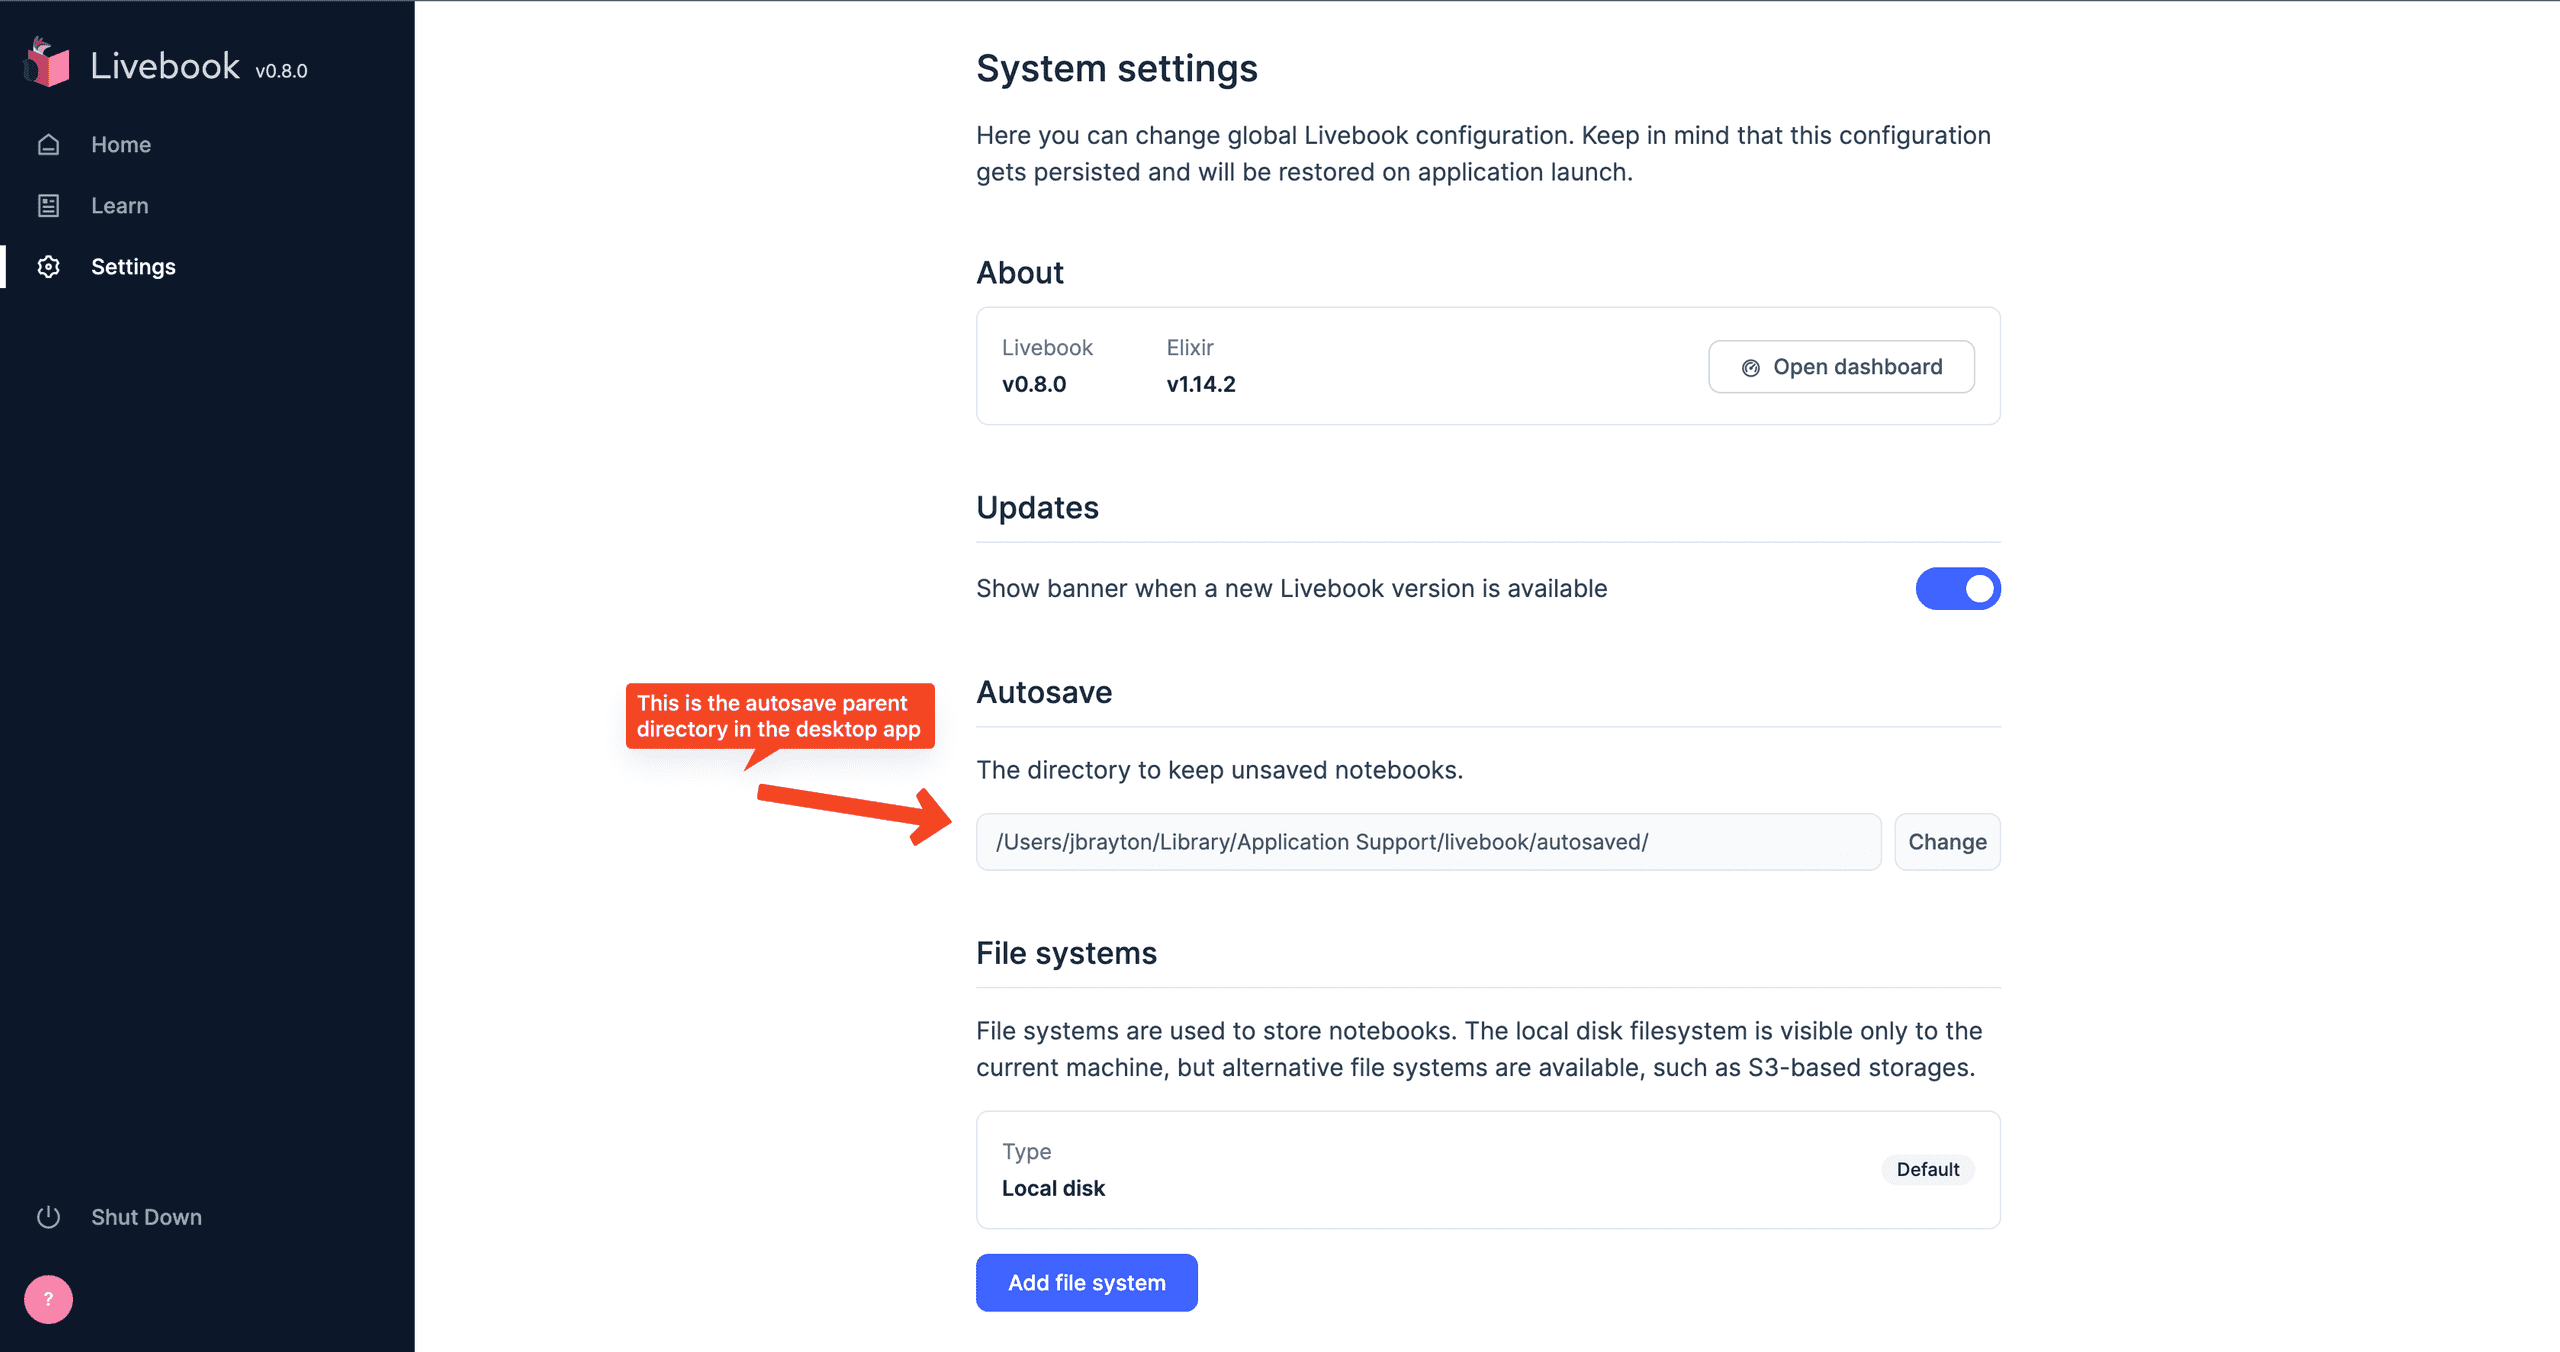
To find your autosave files:
-
For the Desktop application and CLI in production:
~/Library/Application Support/livebook/autosaved/.- On my machine this expands to the absolute path
/Users/jbrayton/Library/Application Support/livebook/autosaved/.
- On my machine this expands to the absolute path
-
For the dev environment: in
config/dev.exs, this is set asconfig :livebook, :data_path, Path.expand("tmp/livebook_data/dev".- On my machine this expands to the absolute path
/Users/Shared/repositories/personal/elixir/livebook/tmp/livebook_data/dev/autosaved/.
- On my machine this expands to the absolute path
-
For the test environment: in
config/test.exsthis is set asPath.expand("tmp/livebook_data/test").- On my machine this expands to the absolute path
/Users/Shared/repositories/personal/elixir/livebook/tmp/livebook_data/test/autosaved/.
- On my machine this expands to the absolute path
Notebooks are saved by day in the autosave directory and the date corresponds to when they were created (when you immediately click the New notebook button).
To view or change your autosave directory in the CLI:
- Go to http://localhost:8080/settings
- Or, if you're already in a notebook, click the Livebook icon in the top left and click
Settingsunder theHomeandLearnlinks.
For the Desktop application, the port will be randomized but you can either change the URL to tack on /settings after the port or click around to the settings page as described earlier.
Tracing the Default Setting
If you are curious as to how this setting gets configured, we can start by looking at Livebook.Settings.default_autosave_path() in https://github.com/livebook-dev/livebook/blob/main/lib/livebook/settings.ex#L32-L34.
We follow Livebook.Config.data_path() to https://github.com/livebook-dev/livebook/blob/main/lib/livebook/config.ex#L76-L78 then the Erlang function :filename.basedir(:user_data, "livebook").
Running this in Livebook we get the output "/Users/jbrayton/Library/Application Support/livebook", precisely where the desktop app stores its files.
Finding Files
What lead me to this discovery, after vaguely remembering autosave was a thing, was looking for files on my computer.
I purposefully install and use the locate command because I find it far easier to use than remembering the find -name syntax.
Here's the output for checking that the word autosave is in any directory or file name:
⋊> ~ locate autosaved/
/Users/Shared/repositories/personal/elixir/livebook/tmp/livebook_data/dev/autosaved/2022_10_31/18_25_03_mapset_drills_hedh.livemd
/Users/Shared/repositories/personal/elixir/livebook/tmp/livebook_data/dev/autosaved/2022_11_03/18_12_21_teller_bank_challenge_pv4e.livemd
/Users/Shared/repositories/personal/elixir/livebook/tmp/livebook_data/dev/autosaved/2022_11_03/18_13_39_untitled_notebook_pidb.livemd
/Users/Shared/repositories/personal/elixir/livebook/tmp/livebook_data/dev/autosaved/2022_11_03/19_31_57_dockyard_academy_amas_p75r.livemd
/Users/Shared/repositories/personal/elixir/livebook/tmp/livebook_data/dev/autosaved/2022_11_03/20_02_17_intro_to_timescale_jm7r.livemd
/Users/Shared/repositories/personal/elixir/livebook/tmp/livebook_data/dev/autosaved/2022_11_08/11_10_21_untitled_notebook_ervg.livemd
/Users/Shared/repositories/personal/elixir/livebook/tmp/livebook_data/dev/autosaved/2022_11_22/19_15_12_untitled_notebook_p75e.livemd
What I found interesting was that my files in ~/Library/Application Support/livebook/autosaved/ did not show up.
Had I not realized there could be different locations, I may have overlooked the notebook I was looking for all along.
I have no clue why locate doesn't scour the directories in ~/Library it should have access to but that's a problem for another day.
Introduction to DockYard Beacon CMS
In December of 2021, Brian Cardarella introduced DockYard Beacon CMS in this series of tweets:
Over the course of the past year, I've created a sample project a total of 3 times to get a better understanding for how it operates. I haven't seen a ton of content on Beacon beyond announcement tweets, the mention in the ElixirConf 2022 keynote, and https://beaconcms.org/. This post covers the complete instructions in the readme with some notes on where to go from here. I had run into a few snags at first but a lot of those initial pain points have been hammered out so far. While a basic "Hello World" sample project is great, I plan on expanding on the sample with deeper dives into how Beacon serves up content. It takes a few novel approaches I haven't seen before to create either a CMS that runs along your application or it can be centralized with multi-tenancy. One CMS can service all of your ancillary marketing sites, blogs, or wherever you need the content.
The following instructions are also listed on the sample application readme so you're welcome to skip them if you want to look at the code.
Installation
Steps
-
Create a top-level directory to keep our application pair. This is temporary as the project matures.
mkdir beacon_sample
-
Clone GitHub - BeaconCMS/beacon: Beacon CMS to
./beacon.git clone git@github.com:BeaconCMS/beacon.git
-
Start with our first step from the Readme
- Create an umbrella phoenix app
mix phx.new --umbrella --install beacon_sample
-
Go to the umbrella project directory
cd beacon_sample/
-
Initialize git
git init
-
Commit the freshly initialized project
Initial commit of Phoenix v1.6.15as of the time of this writing.- I prefer to capture the version and everything scaffolded as-is. This allows us to revert back to the pristine state if we ever need to.
-
Add :beacon as a dependency to both apps in your umbrella project# Local: {:beacon, path: "../../../beacon"}, # Or from GitHub: {:beacon, github: "beaconCMS/beacon"},- Add to
apps/beacon_sample/mix.exsandapps/beacon_sample_web/mix.exsunder the sectiondefp deps do. - We choose the local version to override commits as needed. When the project solidifies, the GitHub repository will be far more ideal.
- I'll want to research the git dependency as I believe we can specify commits? There's possibly no need to have a local revision at all.
- Add to
- Run
mix deps.getto install the dependencies. -
Commit the changes.
Add :beacon as a dependency to both apps in your umbrella projectseems like a good enough commit message.
-
Configure Beacon Repo- Add the
Beacon.Repounder theecto_repos:section inconfig/config.exs. -
Configure the database in
dev.exs. We'll do production later.# Configure beacon database config :beacon, Beacon.Repo, username: "postgres", password: "postgres", database: "beacon_sample_beacon", hostname: "localhost", show_sensitive_data_on_connection_error: true, pool_size: 10
- Add the
-
Commit the changes.
Configure Beacon Reposubject withConfigure the beacon repository in our dev only environment for now.body.
-
Create a BeaconDataSource module that implements Beacon.DataSource.Behaviour-
Create
apps/beacon_sample/lib/beacon_sample/datasource.exdefmodule BeaconSample.BeaconDataSource do @behaviour Beacon.DataSource.Behaviour def live_data("my_site", ["home"], _params), do: %{vals: ["first", "second", "third"]} def live_data("my_site", ["blog", blog_slug], _params), do: %{blog_slug_uppercase: String.upcase(blog_slug)} def live_data(_, _, _), do: %{} end -
Add that DataSource to your
config/config.exsconfig :beacon, data_source: BeaconSample.BeaconDataSource
-
-
Commit the changes.
Configure BeaconDataSource
-
Make router (
apps/beacon_sample_web/lib/beacon_sample_web/router.ex) changes to cover Beacon pages.-
Add a
:beaconpipeline. I typically do this towards the pipeline sections at the top, starting at line 17.pipeline :beacon do plug BeaconWeb.Plug end -
Add a
BeaconWebscope.scope "/", BeaconWeb do pipe_through :browser pipe_through :beacon live_session :beacon, session: %{"beacon_site" => "my_site"} do live "/beacon/*path", PageLive, :path end end -
Comment out existing scope.
# scope "/", BeaconSampleWeb do
#   pipe_through :browser

#   get "/", PageController, :index
# end
-
-
Commit the changes.
Add routing changes
-
Add some components to your
apps/beacon_sample/priv/repo/seeds.exs.alias Beacon.Components alias Beacon.Pages alias Beacon.Layouts alias Beacon.Stylesheets Stylesheets.create_stylesheet!(%{ site: "my_site", name: "sample_stylesheet", content: "body {cursor: zoom-in;}" }) Components.create_component!(%{ site: "my_site", name: "sample_component", body: """ <li> <%= @val %> </li> """ }) %{id: layout_id} = Layouts.create_layout!(%{ site: "my_site", title: "Sample Home Page", meta_tags: %{"foo" => "bar"}, stylesheet_urls: [], body: """ <header> Header </header> <%= @inner_content %> <footer> Page Footer </footer> """ }) %{id: page_id} = Pages.create_page!(%{ path: "home", site: "my_site", layout_id: layout_id, template: """ <main> <h2>Some Values:</h2> <ul> <%= for val <- @beacon_live_data[:vals] do %> <%= my_component("sample_component", val: val) %> <% end %> </ul> <.form let={f} for={:greeting} phx-submit="hello"> Name: <%= text_input f, :name %> <%= submit "Hello" %> </.form> <%= if assigns[:message], do: assigns.message %> </main> """ }) Pages.create_page!(%{ path: "blog/:blog_slug", site: "my_site", layout_id: layout_id, template: """ <main> <h2>A blog</h2> <ul> <li>Path Params Blog Slug: <%= @beacon_path_params.blog_slug %></li> <li>Live Data blog_slug_uppercase: <%= @beacon_live_data.blog_slug_uppercase %></li> </ul> </main> """ }) Pages.create_page_event!(%{ page_id: page_id, event_name: "hello", code: """ {:noreply, Phoenix.LiveView.assign(socket, :message, "Hello \#{event_params["greeting"]["name"]}!")} """ }) -
Run
ecto.resetto create and seed our database(s).cd apps/beacon_sample.mix ecto.setup(as our repos haven't been created yet).mix ecto.resetthereafter.
- We can skip to Step 22 now that the
SafeCodepackage works as expected. -
This is typically where we run into issues with
safe_codeon the inner content of the layout seed, specifically:** (RuntimeError) invalid_node: assigns . :inner_content- If you remove the line
<%= @inner_content %>, seeding seems to complete. -
Running
mix phx.serverthrows another error:** (RuntimeError) invalid_node: assigns . :val - It looks like
safe_codeis problematic and needs to be surgically removed from Beacon for now.
- If you remove the line
-
In Beacon's repository, remove
SafeCode.Validator.validate_heex!function calls from the loaderslib/beacon/loader/layout_module_loader.exlib/beacon/loader/page_module_loader.exlib/beacon/loader/component_module_loader.ex
-
Fix the seeder to work without SafeCode.
- Change line 49 in
apps/beacon_sample/priv/repo/seeds.exsunderPages.create_page!from<%= for val <- live_data[:vals] do %>to<%= for val <- live_data.vals do %>.
- Change line 49 in
-
Commit the seeder changes.
Add component seeds
-
Enable Page Management and the Page Management API in router (
apps/beacon_sample_web/lib/beacon_sample_web/router.ex).require BeaconWeb.PageManagement require BeaconWeb.PageManagementApi scope "/page_management", BeaconWeb.PageManagement do pipe_through :browser BeaconWeb.PageManagement.routes() end scope "/page_management_api", BeaconWeb.PageManagementApi do pipe_through :api BeaconWeb.PageManagementApi.routes() end -
Commit the Page Management router changes.
Add Page Management routes
-
Navigate to http://localhost:4000/beacon/home to view the main CMS page.
- You should see
Header,Some Values, andPage Footerwith a zoom-in cursor over the page.
- You should see
-
Navigate to http://localhost:4000/beacon/blog/beacon_is_awesome to view the blog post.
- You should see
Header,A blog, andPage Footerwith a zoom-in cursor over the page.
- You should see
-
Navigate to http://localhost:4000/page_management/pages to view the
Page Managementsection.- You should see
Listing Pages,Reload Modules, a list of pages, andNew Page.
- You should see
Playground
We should put the page management through its paces to determine weak points.
-
Add another more robust layout.
- Can we bring in JS frameworks like Vue? My guess is no, the layout looks to start under a
<main>. - Inject javascript at the bottom, this should load at the bottom of our
<body>section. - Try CDN urls first, then localhost.
- Can we bring in JS frameworks like Vue? My guess is no, the layout looks to start under a
- Add another stylesheet. How do we use
stylesheet_urls? -
Add another more robust component.
- Can we use LiveView slots here? We're on
0.17.7.
- Can we use LiveView slots here? We're on
-
A replica of Laravel Nova panel of pages. Welcome and Home are Laravel defaults. Users would be useful as we could integrate with
phx gen auth.- What migrations are possibly included by Phoenix? Only users?
- Add a user profile page.
Notes
-
The dependency
safe_codewas a problem during my first two attempts.- The third attempt on 11/6/2022 has no issues so far.
-
I ran into issues by failing to add a
BeaconWebscope and adding it asBeaconSampleWebinstead.- Navigating to http://localhost:4000/page/home throws an
UndefinedFunctionErrorasfunction BeaconSampleWeb.PageLive.__live__/0 is undefined (module BeaconSampleWeb.PageLive is not available).
- Navigating to http://localhost:4000/page/home throws an
-
The sample isn't as "pristine" as I'd like due to the bug fix but it really shouldn't be a showstopper.
- Fixed this as I generated a new repository. There really aren't a ton of steps.
- As of 3/16 page management only covers the page. The layout, component, and stylesheet models are not covered yet.
- Stylesheets are injected into the
<head>as inline<style>tags. - Layout sits under
<body><div data-phx-main="true"> - Running the server (
mix phx.server) immediately boots our Beacon components before it shows the url.